About Me

My photo
Sewing is therapy for me. I hoard fabric, patterns, notions, and spend more time shopping for fabric than I care to admit...

Sunday, September 29, 2013

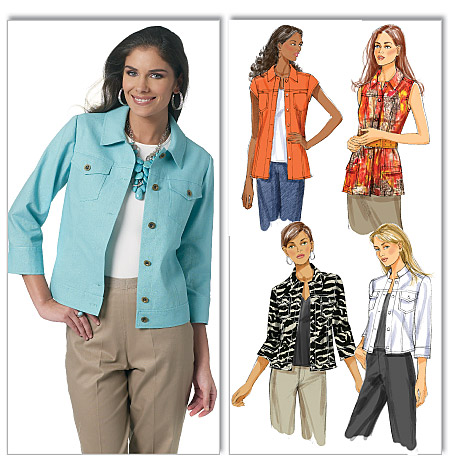
Butterick 5616 Jacket, round 2!


Round 2 of a classically styled jean-looking jacket. 
I made this previously in a printed denim and used a completely different fabric for this round.  Here is a description from the back of the envelope:
Very loose-fitting jackets A, B, C, D in three lengths have princess seams, front and back yokes, slightly forward shoulder, buttoned fronts and topstitch trim.  A, B, below waist, patch pockets with buttoned flaps, three-quarter length sleeves with buttoned cuffs.  A: Stand-up collar.  B: collar, topstitched band at lower edge.  C: Hip-length, collar, patch pockets and cap sleeves finished with bias tape.  D: hip length, collar, patch pockets with flaps and armholes finished with bias tape. 


I made view B this time.  Last time I made view A. 


Fabric: 
I used a cottony, linen-y type fabric I purchased from Marcy Tilton.  I can't decide if it is a deep chocolate brown, a deep gray, or a brownish-black.  I had a whale of a time finding thread to use for the buttonholes!  This fabric was a dream to sew and I just love the silvery-white roses strewn all over the fabric. 

 Likes/Dislikes:
Obviously I like this pattern since I made it up a second time.  The styling is so classic for views A & B.  I am sure I will hang onto it for future use. 
Likes: over all styling, the bottom band, collar, cuffs and patch pockets.  Although you can't see the back of it because of my hair, the collar rolls beautifully despite it not having a stand.
Boxyness of the jacket.  It is perfect for this application.
Easy peasy to put together.

Dislikes:
While I mentioned this as a like, it is also a dislike--if that is possible!  The boxyness of the jacket.  I made an alteration to give it a little less boxy fit.

Alterations/Modifications:
I took the side seams in one inch on each side of the waistline for a total of two inches.  It is still boxy, but not quite as much.  I knew what I was getting into when I cut this jacket out.  I only used one row of topstitching as I didn't want to distract from the beautiful fabric.  

Directions:
Directions are fine except for where the front makes up the button band.  The 'dot' really needs reinforced with stitching and then a clip to the dot before attaching the collar to the jacket.  It is a little fiddly and if you have a ravely fabric like mine, the dot you stitch to seems fragile.  I think this lack of reinforcement should have been examined by Butterick.
I attached the collar before I sewed up the side seams.  I think it is much easier to put in a collar when the garment is flat.
In all honesty, I really think you could sew the sleeves in flat and then sew up the side and sleeves.  They didn't need any easing at all.

Recommendations:
I do like this pattern quite a bit.  I think it runs large through the body, but I have to say that I really like how it fits me in the shoulders.  It seems boxy in the back above the waist despite a sway-back adjustment.  Make this up in a out of the ordinary or unexpected fabric like I did and enjoy the results!

Conclusion:
This is a great pattern with an ugly cover.  It is a classic and I am going to make a long sleeve version soon out of regular blue denim!

Thanks for reading!
Sue


Sunday, September 22, 2013

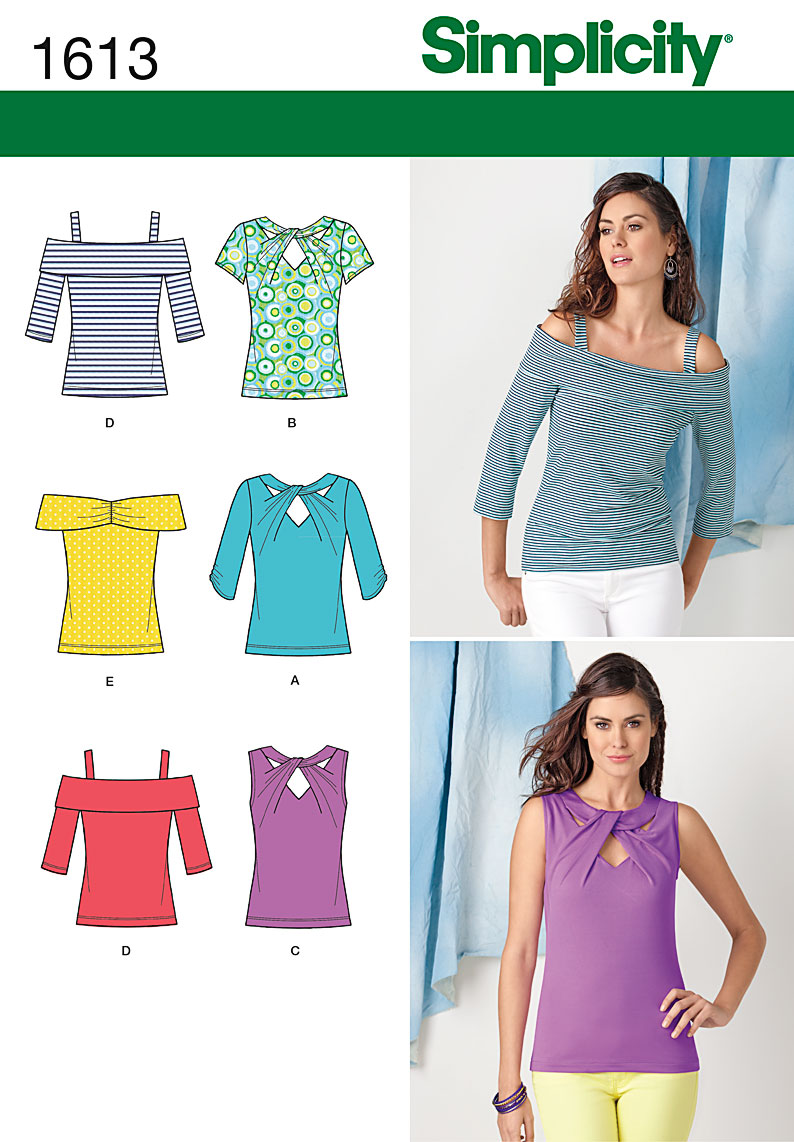
Simplicity 1613 view A


Pattern Description:
Here's what the back of the envelope says: Misses' knit tops.  That's it!  Here's my version: Misses' close-fitting tops in two different styles and three sleeve lengths.  A, B, C has front cross-over detail and D & E have off-shoulder sleeves (That's how I describe it anyway!)


Pattern Sizing:
I purchased the envelope with sizes 12 to 20 in one package.  Since this pattern is pretty close fitting and the tops have a lot of shaping on the pattern pieces, I started with a size 16 figuring I could take it in much easier than letting it out.  Although I messed with the side seams to give it a little bit of a closer fit, I like it: not too loose, nor too tight.  To give you a comparison, with Vogue I typically sew a size 14 as there is a lot of ease.  I not quite a familiar with Simplicity but after seeing this adorable pattern, I will be checking this pattern company out more!

Did it look like the photo/drawing on the pattern envelope once you were done sewing with it?
Yes, I believe it looks a lot like view A, which is the one I made.  I am so glad there is an actual photo on this pattern envelope! As the photos are so much easier to gauge the actual final fit.   
  
Were the instructions easy to follow?
Instructions are decent.  With the neckline on this top you really need to disengage your right brain, throwing all logic out the window and just follow the freakin' directions.  It will all make sense once the front of the top is constructed.    

   
What did you particularly like or dislike about the pattern?
Likes:

Love, love, love the shaping of the top.  There aren't too many t-shirts with waist definition, this one is awesome.  I love the engineering of the front neckline.  I had a few head scratching moments, but once I just followed the visuals I go it.  You just don't expect a knit top to be able to do things like cross over the top band and such.  Pretty cool detail.   
The length of the top is great, not too short, not annoyingly long. 
Did I mention the details? 
Sleeve length is really great as well.  Not too long or short.
Dislikes:
I really can't think of anything I didn't like. 

Fabric Used:
I used this fun floral from Marcy Tilton.  It sewed beautifully! 

Pattern alterations or any design changes you made:
I made my usual 1/2" swayback adjustment.
I also extended the front facing to full length in the front and back.  With my light colored fabric, the white facing I used showed through.  Be aware, if you use a light colored fabric, you will most likely need to line the entire front and back.
I eliminated the ruching on the sleeves.  I didn't feel like the top needed it. 

Would you sew it again? Would you recommend it to others?
This is a fairly easy pattern.  If you have sewn with knits, you'll do fine with this pattern.  Just disengaged your brain and follow the illustrations and you will end up with a great top.   

Conclusion:
I love this top but found it to be too low cut for work low.  While the photo shows it being drastically low, I choose to ignore this and carried on.  I am wearing a simple black cami underneath and if I plan on wearing this to work, will have to remember to do a mirror check.  

Thanks for reading!


Sue

Jalie Top! 3132


Oh how I love Jalie Patterns!  So well drafted, so easy to sew, so stylish....I could go on and on and on! 
This one is no exception!
Here is my review for this top: This is a nursing tee and hoodie and no, I am not nursing, but I love the style.  It is also a regular pattern as well.  Both styles are available in two lengths (T-shirt and tunic) 

I made view B in the tunic length.  It has 3/4 length sleeves and a v-neck.  Very simple styling. 

Fabric used: a lovely tissue knit I purchased from Marcy Tilton.  It was a dream to work with!  I love the weight of it for fall.  It is however a tissue knit and will be wearing a cami underneath as I have on in the photo. 


How were the directions?
Absolutely great!  Even though Jalie's directions are sparse but I like to view them as concise and succinct.  Visuals were great as well. 

What did I like/dislike about the pattern?
Likes:
Shaping of the tee.  It is 'fitted' for a t-shirt with a nipped in waist.  Love, love, love that feature. 
Fit is just great, especially through the shoulder seams.  With some more fitted t patterns, the shoulder seams are pretty narrow but this one isn't.  I will use this shoulder line to measure up to other patterns I use. 
Love the lengths of the sleeves and body of the tunic.  This is perfect for someone taller like me and when you are wearing leggings you don't have to worry about tugging the thing down to keep things private. 
I love how the v-neckline goes together.  It was simply magic!  The directions have you stay-stitch the neckline between the notches, clip to the v in front.  When I attached the neckline I had the shirt facing skyward and stitched on top of the stay-stitching.  It gave me what I feel is the perfect v neck.  Very professional looking inside and out. 


Dislikes:
My only dislike is that the shoulders weren't stabilized in the directions.  I simply stitched clear elastic into the seam. 


Recommendations?
Oh yes, I highly recommend this top.  It is stylish, comfortable and has a variety of uses in different fabrics, lengths, with or without the hood and kangaroo pocket, etc.  I can see why Jalie is the master of knits.  Ignore the bad bra back, I really need to throw that one in the garbage.  That is what I get for not doing laundry soon enough and having to wear a bra that doesn't fit all that well.  :) 

Conclusion:
Love this pattern.  I plan on keeping it close at hand.  I plan to make my DD one since she is nursing and I am anxious to see how that goes together. 

Sunday, September 1, 2013

Burda Scarf Tunic

I'd made this lovely tunic several weeks ago but then arrived this little one and even though I am just grandma (for the first time) he is consuming all my thoughts and sewing time right now. Which is more than okay with me!  I just finished the super cute grommeted draperies for his bedroom and am going to go help momma put them up today. 
Next, I really have to finish his quilt.  It has been a work in progress since March.  When you see the finished product, you'll know why!

So here is my review for the Burda Scarf Tunic.  
Pattern Description from Burda Sewing Magazine:
Of course you are the fairest of them all, especially when you are wearing this top.  You will be surprised how easy it is to sew.  An unusual touch, the collar ties in the back and draws attention to a beautiful nape.


Sizing: All sizes from 36 to 44 are included with this pattern.  I made a 40 and feel it fits like I wanted it to for a tunic.


Fabric used: I had this crepe de chine type fabric for a while.  I think I purchased it at JoAnns this past spring.  I really love the colors in it.  I had been reading quite a few reviews about using this silky fabric and liked a fellow PR's strategy of running through the wash several times on hot water to remove some of the shine and give it a different hand.

Did it look like the finished drawing? Yes, it does however you'll notice that in the side view the back keeps slipping down.  It is due to the weight of the tie in back.  If I make this again, I will wear it a while before hemming it and cut it so the front is longer than the back and I won't have to tug it down so the hemline is even. 

How were the directions?  Actually they were really good and complete with visuals.  This pattern was part of a sewing lesson for beginners.  There is a two-page spread devoted to this top!  There are only three pieces to this top and it goes together quickly. 

Modifications/Recommendations?
Just my usual 1/2" sway back adjustment.  I lengthened it about 2 inches so I felt comfortable wearing leggings and not worrying about anything showing that should stay under raps.  :) 

Conclusion:
A fun tunic and the back tie is just so girly and pretty!