About Me

My photo
Sewing is therapy for me. I hoard fabric, patterns, notions, and spend more time shopping for fabric than I care to admit...

Thursday, February 27, 2014

Reprise of Marcy Tilton's Vogue 8636

Here is another version of Vogue 8636.  This pattern is a TNT for me.  I've made it so many times that the pattern is looking pretty ragged!  Here's my latest version.  

V8636

 Here is the description from the back of the envelope: Fitted, pullover tops A, B, C, D with darted neckbands.  A: contrast sleeve and neck band, lower edge of sleeve is raw-finished.  B, C: three-quarter length sleeves.  C: pleats over front neck darts, decorative buttons.  D: darts on outside of neckband and lower edge of sleeve.


I modified view B.  More on modifications below.  Here are pictures of previous versions:


For this version, I used a knit with Lycra I purchased from Marcy Tilton.  I really like the uneven stripes but this fabric was a PAIN!!!  The print on the fabric was created by ME!  I screened printed the motifs on the fabric AFTER I had the pattern cut out.  It was great fun!  Just for some extra bling, I added crystals to parts of the design.  You can see those in the side view.  Also, the paint doesn't stand out as much as it seams to.  The side view that unfortunately is a little blurry, is more true to color.


This top is super easy to put together and has so many design possibilities!  You can use a variety of fabrics, patterns, weights and has become a TNT for me!   As you can see from the back view, I had to add a band piece because I messed up cutting the pattern out and didn't have quite enough so I cut a piece on the cross grain just to add some interest to the back and also since this fabric rolled so very much, I didn't think I'd ever be able to match the stripes perfectly.  And speaking of stripes, I am pretty proud of how well I matched up the stripes.  With the rolling this fabric did, I didn't think it would be possible to get a decent match up.


What I liked/disliked:
Love the styling with the raglan sleeves.
The neckline is appropriate for work.
This top takes relatively little fabric and you can play with embellishments!  What more could you ask for? 
No dislikes whatsoever!

What I changed:  Screen printing, of course in a teal like blue-green that I had on hand.  Paint was from Dharma Paint Co.  Silk screen is from Marcy Tilton.
I lowered the neckline 2 inches in front.
With previous versions I didn't like the wide neckband so I narrowed it to 1/2" finished.  The fabric rolled so darn much that I cut the neckband on the bias and attached it.   

Would I recommend this?  Absolutely!  I've made this about four times now and the pattern is getting a little worn.   

Conclusion: great top!  Try this pattern! 

Thanks for reading!
Sue

Tuesday, February 18, 2014

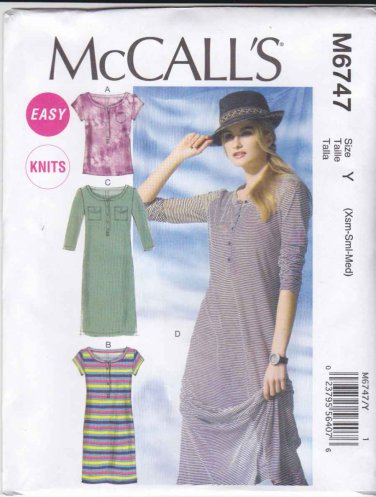
McCall's 6747--Wishing for Spring!

I've had this pattern since last summer and then ran out of time to put it together.  One of my New Year's Resolutions was to use more fabrics from my stash.  I'm not doing so well overall with that, but if I start with a list of fabrics I must use before spring/summer then mark this one off the list and continue my resolution as least started.  :)  

There are some super cute versions of this easy-wearing dress.  Here's mine.  Let me know what you think.  

Pattern Description: 
Misses' top and dresses: Pullover, close-fitting top and dresses have button neck and front bands and stitched hems.  A: Narrow hem on sleeves.  C: Button flaps.  A, C: Pockets.  B, C, D: Fitted through hips. C, D: Back hemline slit.


I made the length of view B, with the sleeves of D and one pocket with a rounded shape.  
I made a size medium that I completed a cheater FBA by adding 1/2 inch to the side seam at the bust line.  

Fabric used: This is a poly-lycra blend I purchased from Marcy Tilton.  It was a breeze to work with, washed beautifully, and had minimal rolling at the cut edge.  


I believe my finished dress looks like the pattern envelope.
Directions--actually they missed a few steps that make a much nicer finished garment that a few reviewers have already mentioned.  Here's what I thought about them--and yes, I did read and try to follow them.  It has been a very long time since I'd made a placket like this and I wanted to make sure I got it right.

Reinforcing the inner corners of the front by pivoting at the small circles is essential and you have to mark carefully or you'll end up with a weird looking and weirdly placed placket.  I did interface the front bands as directed with Fashion Sewing Supplies interfacing--best stuff on the planet.  I'm sorry, I don't know exactly which product I used as I have quite a few pieces of it.

Next, I slashed the front opening with my rotary cutter and a ruler, stopping about 3/8" from the lower edge.
I cut from the line to the corners by cutting on the diagonal.  Sewing the bands onto the front openings was very easy with this super straight line.  I also followed the directions to finish off the lower band of the placket by slipping the triangle piece along with the bands to the inside.  I neatened up the edge with my serger and then sewed the X onto the bottom to reinforce the area.  For not having made a placket in a long time, I am happy with how it turned out.


I stitched only one pocket on and rounded the lower edges using my SA curve.  I typically don't make curved seams on knits, but I'll have to do it more often.  The right tools make such a big difference.


Next you stitch the center back seam and I was going to try and match the polka-dots, but talked myself out of it.  I have to say, the shaping on the center back seam is really nice.  While the dress looks boxier, it could be much worse!

Per my usual construction methods, I reinforced the shoulder seam with 1/2" clear elastic serged into the seam.  I think it's the only way to roll.

Stitching on the neckband was pretty easy.  There is no interfacing in the neckband, so if you want to put button holes in the knit, make sure you stabilize it with interfacing.

Here's something else I did that I don't typically do.  I followed the directions for setting in the sleeves.  It's a knit garment, so I ask why?  It did work and it was effortless.  I didn't need any ease stitching at all, so it was sort of like laying the sleeves in flat--in an abstract sort of way.

I used my cover-stitch machine on the sleeves and the lower hemline. I feel like I am still learning how to use it with good results.

Instead of buttons, I used snaps.  I used fairly small snaps as it was the size that looked best when I experimented with which size to use.

I made my usual 1/2" sway back adjustment by wedging out the maximum at the center and tapering to nothing at the side seams.


All in all, this is a fairly good pattern if you've had experience in making a placket and sewing with knits. While the directions aren't stellar, they work.

I'm happy with my new dress.  My photographer wasn't home, so you'll have to do with the dress hanging out with Grace.  It hits me about mid-knee.  If DH doesn't like it, I might use this dress as pjs.

Thanks so much for reading!
Sue


Wednesday, February 12, 2014

Bra #2. Another Pin-up girls pattern

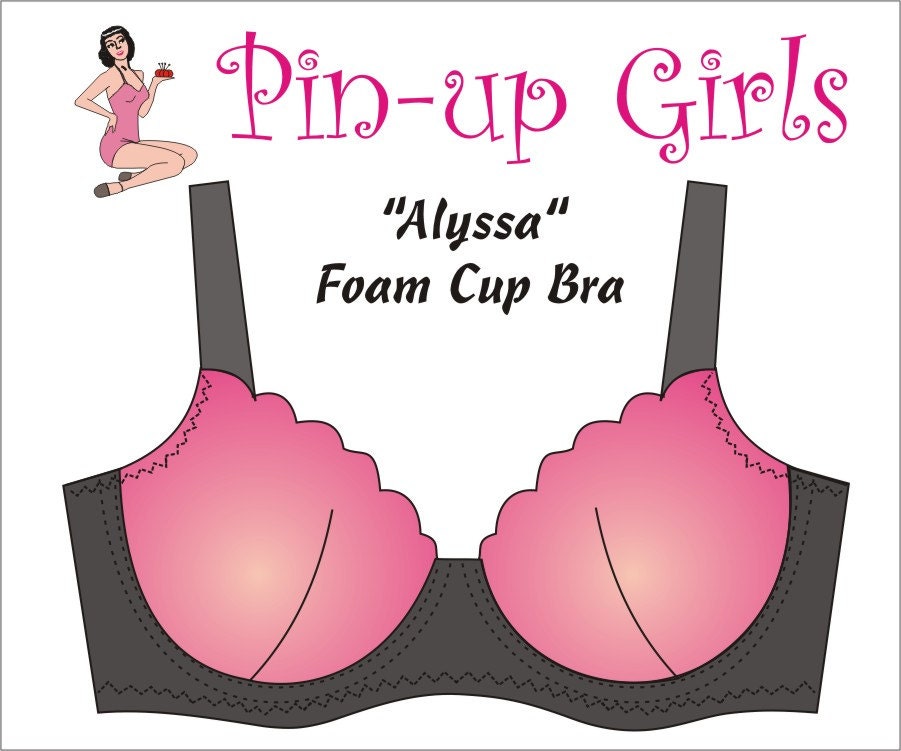
So here is bra 2.  I wanted a bra with lining and under wire support.  Since I enjoyed creating the first bra from pin-up girls, I decided to give the company another try.  This time I order the pattern for the Alyssa lace and foam bra.  This one seemed to resemble the type of bra I would purchase from VS with the foam cups, under wire, full-coverage the the prettiness factor I was looking for.

Here is my review.

So, no description again but here is mine: foam cup bra with lace cover has under wire support, fuller coverage and wider straps.

The ALYSSA Lace over Foam cup bra PATTERN  by Pin Up Girls
This bra allows for typical foam bra cups or push up bra cups.  I have enough natural cleavage so I purchased and used the natural or typical bra cups.    

Construction was easy, especially since I had already made a bra. The illustrations are more than adequate to make a bra.
I slightly veered from the instructions except to use a stretch lace fabric rather than a 6 or 8 inch wide lace to cover the cups.  I purchased a small kit from bramakers.com to make this bra and I had lace to complete the inside of the straps, or those closest to the neckline, so I went ahead and added that trim.  I think it finished off the top edge of the bra nicely and adds another dimension of pretty.  I only wish I had ordered the same color foam cups and the stretch fabric so everything matches. 


Likes/dislikes:
Even though I measured carefully, I found this bra and the cups to be too large.  I'm going to think over what I can do to fix it rather than scrap the whole thing.  For me, it was really tough to make changes to the fit of the bra prior to construction.  If you've made one, you'll know what I mean.

Modifications/Alterations:
None prior to construction, however I am going to have to figure out what to do to make this fit better.

Conclusion:
I am glad I tried this pattern as it has more support that the classic bra pattern which is a must for me.  I am going to work on perfecting the fit so I can achieve a comfortable yet stylish bra!

Thanks for reading!
Sue
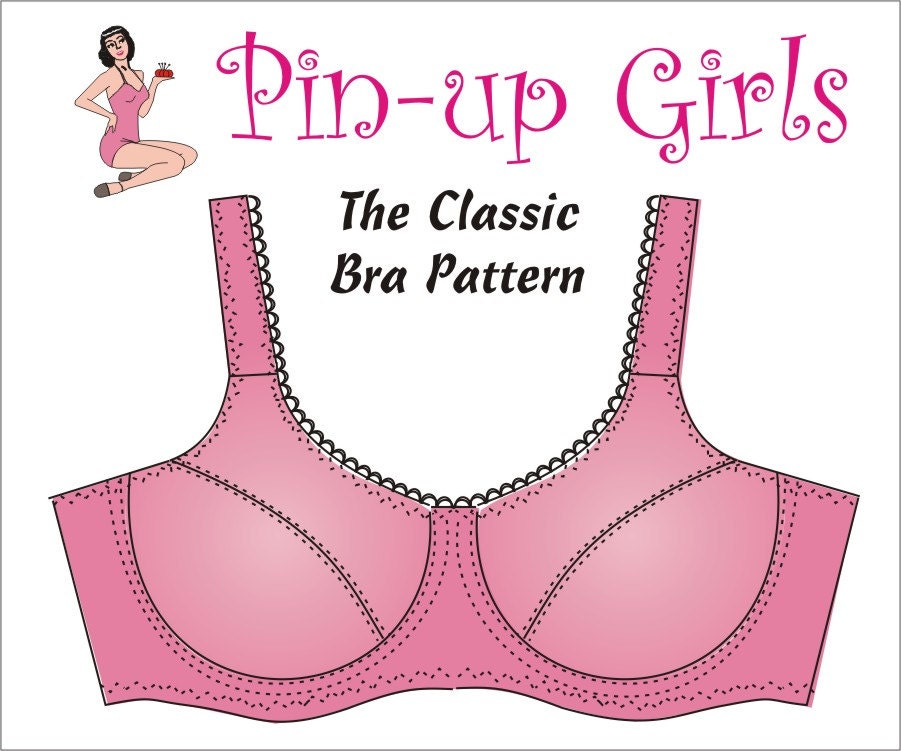


Pin-up girls classic bra!

I completed one of my new year's resolutions--to make a bra!  How fun and so much easier than I had anticipated.  Here is my review for the classic bra pattern.

Pattern Description: There really isn't one on the pattern I purchased, so here is my own.  Full-coverage, unlined bra with partial or full band has cup seams, elastic picot edging, and somewhat wide, comfortable straps.

The CLASSIC Bra PATTERN  A Pin Up Girls Original Pattern

Sizes: Believe it or not, I purchased a small pattern (despite my full bust).  The pattern I purchased covers sizes 30AAA to 38D.  What a wide range of sizes!

The pattern and Manual to get your started are excellent.  The visuals are great and if you've never made a bra before, I highly recommend purchasing the manual as well.  Since I am a visual learner, the pictures were indispensable for me to construct this bra.  

Did my finished bra look like the pattern?  Well, yes, I do believe it does.

Directions: they are really good, even if you've never made a bra (like me!).  The manual has many photographs and the pattern itself has many line drawings, all of which are very helpful.

I purchased the small kits to go along with everything I needed to construct two bras.  The one I photographed is made with one of those kits.  Kits are available at www.bramakers.com

What did I like/dislike?
Directions are great, really great.  If you follow these directions exactly, you'll end up with a well-fitting bra.  I measured everything very carefully and constructed everything slowly so I didn't have to use the dreaded but helpful seam ripper.
I really wish this bra pattern had more support.  I like bras with a little padding and under wires to accommodate my fuller bust.

Modifications:
None.  This was my first ever bra and I wanted to see what if anything I would need to adapt.  I found the bra to fit well and most importantly feel comfortable.  Did I also mention it is pretty?

Conclusion:
If you have always wanted to tackle making a bra, I believe this is a great pattern to start with.  Just cut carefully and follow the directions carefully, slow slowly and you'll end up with a pretty undergarment.   Construction from beginning to end is relatively fast, a bra can be completed in a short time.

Thanks for reading!
Sue


Tuesday, February 11, 2014

Vogue 8799 Jacket


I've had this pattern for quite a while but it wasn't until another gal on SPR reviewed that I finally said, I have to make this now!  I just love the lines of the jacket.  It's unique.  It's different.  It's making we wish for more spring clothing.  Here's my review for Vogue 8799. 


Pattern Description: Misses' jacket, top, dress, skirt and pants.  Loose-fitting, unlined jacket A has collar, elastic back, and two-piece sleeves with elastic forming ruching effect and slit, topstitching.  Fitted top A or B has seam detail and back zipper.  Dress C back slit.  Semi-fitted skirt D or straight-legged pants E has self-lined yokes.  D, pleated lower back.  A, B, C, D: Lined.  B, C, D, E: Stitched hems. 
Well, I already see a problem, did you notice it to?  Jacket A is described as unlined early in the description but at the end of the description it states that A, B, C, D is lined.  Someone needs to proof read better!  The jacket is most definitely lined.

Sizing: this is a multi-sized envelope with sizes 6 to 14 or 14 to 22 .  I started with a 16 based on other reviewers comments regarding the shoulder area but ended up grading it down to a 14 in most areas.


Fabric used: Cotton Stretch Sateen.  It was from my stash.  The lining fabric was also from my stash.

Did the finished garment look like the pattern envelope?  Yes!  I do believe it does! 

Directions: they are fine, not easy as the envelope states, but okay.  I varied from the directions as I'll state below.  I think the only way the construction is easy is because there are no button holes or zippers.

Likes:
  • Styling.  
  • The ruching on the sleeves is fun.  
  • I like there are no closures.  
  • I like the stand collar.  
  • The princess-type seams are also cute.
  • The elastic back waistline is also fun.
  • The edge to edge lining.  
Dislikes:
  • How the elastic is inserted into the back waist.  
  • How the elastic is inserted into the sleeves.
  • How the elastic is inserted.  I modified that step.  
Modifications/Alterations:

The directions have you line the body of the jacket and reach through to sew a waistline casing.  I waited to sew the bottom hem and then sewed the casing.  Next, I used steam-a-seam and pressed the hemline up on the jacket body and lining and topstitched.  It took a few minutes but I like how it turned out.
I also altered the back by my typical 1/2" swayback adjustment.  Totally worth it.

As I mentioned earlier, I started with a size bigger than typical simply because it seemed to other reviewers to be a little snug in the shoulders.  Everywhere else I graded down to a 14 and like how it fit.

Conclusion:
This is a fun little jacket.  I enjoyed making it but think the easy rating is inappropriate.  It's cumbersome to say the least.  While I made the sleeve casing as stated in the directions, it was very fiddly to say the least.
I can't wait to try the top or dress.  The lines intrigue me.

Thanks for reading!
Sue 

Sunday, February 2, 2014

Kwik Sew 3618

Oh, I finally got a sewing project done and I have to say, I am happy with the results!  And who wouldn't be with such a cute little vest.  Here is my review for Kwik Sew 3618. 

Pattern Description: Misses' semi-fitted vests have collar, front and back yokes, three panel front and back, topstitching detail and armholes are finished with self fabric, bias cut bindings.  View A has front pockets in seams and decorative buttoned tabs on back at waist.  View B has pockets in yoke seams with flaps.


Sizes XS to XL are all in one envelope.  I started with a Large based on my full bust but graded down to a medium as it was too large.  I guess I should have guessed that based on the pattern photo, but I'd rather take something in that try and let it out.

Fabric Used: This was a stretch denim I purchased from JoAnns.  It was reasonably priced and washed up great.  Of course I used interfacing from Fashion Sewing Supply.   

Directions were great as is usually the case with Kwik Sew.  Everything was in logic order and all the notches matched up beautifully.  Of course, I made a few modifications which I'll highlight below. 

Likes/Dislikes:
1.  I love the classic jean-jacket styling.  This is exactly what I was looking for in a pattern.
2.  Love how there is a separate under collar piece.  When constructed, the upper collar slightly rolls to the under collar and lies beautifully against your neck.  
3.  I really like the length of view B .  Sometime I may try view A and determine if I like that length as well.  
4.  The flap pockets are real working pockets that are cleverly made.  Here are some of the major steps. 


Dislikes:
1.  How boxy/big the pattern is.  I should have known.
2.  The armholes are a little deep, but usually when you want to layer, you want them deep.  It's just a personal preference.  Next time I'll change that a bit.

Modifications/Alterations:
1.  1/2" sway back adjustment, but it looks like I could have used more.
2.  I ended up taking the waistline in about three inches distributing it on all the seams, but especially on the side seams.
3.  I made flat felled seams on the front and back pieces.  It is so nice and tidy on the inside that I'm glad I took the time to do this.
4.  I attempted to make an FBA by adding 1/2" at the front side and front middle panels at the bust apex.  Although that seems like a minor adjustment it did make the bust area lie better--exactly what I was hoping for!

Conclusion:
I had fun making this little vest.  I seem to be on a vest kick lately, but they tend to be fairly quick and fun!  If I make this again, I'll make a bigger sway back adjustment, use the flat felled seams, rework the armholes, but leave everything else alone.
If you're looking for classic jean jacket styling, this is the pattern for you!

Thanks for reading!
Sue