About Me

My photo
Sewing is therapy for me. I hoard fabric, patterns, notions, and spend more time shopping for fabric than I care to admit...

Wednesday, May 28, 2014

McCall's Lace Dress M6883

M6883I had to make this dress.  It's so sweet and when I found the fabric that matched the envelope picture at JoAnns, I was sold!  I didn't even look at reviews I just snatched it up! 
What is really weird is that my pattern envelope doesn't match the McCall's pattern website for just the number.  My envelope says MP343 rather than M6883.  Not sure why?  Anyway here is my review.


Line Art
Pattern Description: Misses' dresses and slip.  Dresses, fitted through bust, have neck band and back zipper.  A, B: Back straps, elasticized upper back, hook and eye on back band.  B: shaped hemline, wrong side shows.  C: Stitched hem on sleeves.  A, C: Lower band.  Close-fitting bias slip has shoulder straps.  B, D: Narrow hem. 

Sizes range from 6 to 14 or 14 to 22.  I made a size 14.

Suggested fabrics are Poplin, Sateen, Cotton Blends, Linen, Lace, eyelet. C: Organza.  D: Charmeuse, Crepe de Chine.  Notions are 1-14" zipper, 3 Hooks and eyes.    For A & B you also need 1 yard of 1/4" elastic.


Obviously I made view C but I made a few changes.  More on that later.

Finished garment: I think it resembles the pattern photo, especially since I used the same fabric!  I obviously made changes at the neckline, sleeves, and hem.

Directions--I didn't notice any difficulties with them.  There are just 26 steps to this dress, provided you don't make changes.  I probably just glanced at the images.  For the slip, there are only eight steps.  Love an instant gratification project once in a while!

Likes/Dislikes:
The style, it is easy to wear.  I had fun making this pattern.  It fit well and I made so few modifications to it.
My only dislike is that the opening from the top of the zipper to the neck band is open.  Any ideas on why?

Modifications/Alterations:
1.  My usual 1/2" sway back adjustment.
2.  I made narrow french seams on the sides of the dress.  
3.  The one thing I don't like about this pattern is that with the lace dress, the directions have you use self-fabric for the neckband and hem.  Well, if you use lace like I did, it's not the prettiest finish.  Know what I mean?  Also, interfacing is also required and I wanted something opaque so I purchased about a half-yard of the white silk charmeuse and used that for the hem and neckband.  That way my interfacing didn't show through and it gave this dress a little more polish.  To have everything coordinate, I also made narrow charmeuse bands for the sleeve hem.
4.  For the slip, my only modification was to zig-zag the hemline since you wouldn't see it with the band of the dress covering it up.   
5.  I used two hook and eyes on the neck band instead of three.

Will I sew it again? Probably not--that doesn't mean I don't like it.  I am happy with the finished dress.  I have so many patterns that I haven't touched that I need to keep looking to my queue instead of revisiting patterns I have used.     

Conclusion/Recommendations:  This was an easy little dress to sew up and fun to wear.  Although the contrasting slip was a bold choice, I am glad I went with it.  Although DH didn't get my shoes in the picture, they matched the slip perfectly!

Thanks so much for reading!
Sue

Sunday, May 25, 2014

Vogue 8774


Hello!  My semester from hell is finally over and I am back to sewing!  I bit off  more than I could possibly do and stay sane.  My full time job as an instructional coach, teaching 2 classes at South Dakota State University and taking a graduate level class was a lot.  I should have known better, but I really need to learn to say no. It is finally over and I can get my life back.  Yay!

I purchased this fabric earlier this winter when I was visiting DD1 who lives in Delaware.  I loved it when I bought it but had no plan.  DD1 said, "Pants, mom.  Pants."  Really?  Pants?  I asked again and she insisted so here is my review for this Vogue pattern made with this wild fabric!


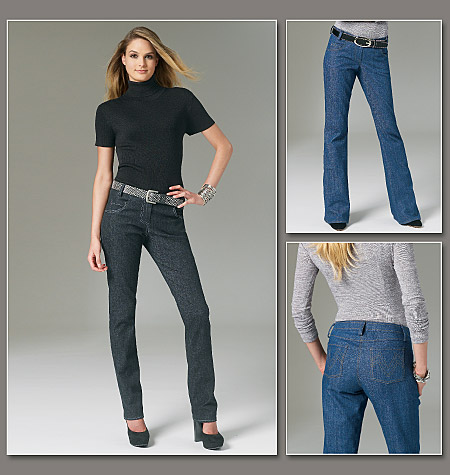
Vogue 8774, rated Average.  Description: Fitted, tapered or straight-legged jeans (below waist) have shaped waistband with hook and eye closure, carriers, front and back pockets, back yokes and binding for front fly zipper closing.  Topstitching and narrow hem.  Purchased belt.

Pattern Sizing: AAX (4 to 10) C5 (10 to 18).

Fabrics: Denim, lighweight canvas, velveteen.  Lining lightweight twill.  My fabric came from the home decor department, which DD2 promptly said she they looked like drapes.  Hmmm...., what do you think? 

Notions: one 7" zipper, one hook and eye closure and heavy thread for topstitching.

Yes, despite the fact my fabric is busy, it does resemble the pattern envelope.  At least I think so anyway!  I started with a 16 but took these in quite a bit at the waistline, a little in the hips and some in the thighs.  I made view A.  The pattern envelope doesn't have them cuffed, but it was so dreadfully humid today, I decided they needed to be. 

Directions: I thought the directions were really good.  Especially for the fly construction.  One of my beefs with patterns is that the fly doesn't fully cover the zipper however this pattern compensates for this!  Yay!  I thought everything was logical and put together in an intuitive manner.  There were a few steps I eliminated but more on that later.  

Likes:
1.  The one piece shaped waistband.  Comfortable and hits me at a great location wear wise.  Sort of at the top of my hip bone and doesn't dig into my waist.
2.  The fly construction.  As I stated previously, the fly covers the zipper completely.  Unlike some other patterns I have tried.  For this reason only, I will be using this pattern again!
3.  The back yoke, I like this.  It gives more shaping and ability to make a swayback adjustment easily.  Plus, I think it gives the pattern a sort of designer look.
4.  Belt loops that attach to the yoke.  I like this feature.  It makes the attachment of those easy and gives the pants a different look.  I don't think the loops are too long at all, despite what some other reviewers have said about this feature.
5.  Length.  Even though I cuffed my pants, they hit me just at the top of my foot.  Perfect.
6.  Although I didn't do this step, I do really like finishing off the fly facing with the bias edging.  I see this in higher end RTW all the time and do appreciate the extra little detail.  I do agree with other reviewers that this makes the denim rather bulky, but you could use a fabric that is rather light weight and it wouldn't necessarily add bulk.
Dislikes:
1.  This was my only dislike regarding the pattern.  If you choose to topstitch the design on the back pockets (view B) you should use interfacing?  Really?  I've never heard of this before. I didn't use all the rows of stitching but I did make one line of the design so no need for the interfacing.

Modification: I made my usual 1/2" swayback adjustment by shortening the seam between the back yoke and the waistband.  I think I could have gone another 1/4" at least and may try that next time.
As I said earlier, I took in the waistband about 1" and the hips about 1/2" and the upper thighs about an inch.  I really like the fit.  They are comfortable and don't gap anywhere.  

Recommendations:  Oh yes, I do recommend this pattern.  I like the fit, it was easy to put together and fairly fast.  I cut this out in an hour or so and stitched it up in about 3 hours.  For a puttzer like me, this is FAST!

I will be making more of these!
Thanks for reading!
Sue


Thursday, May 22, 2014

Simplicity 1717

Here is one of Simplicity's Amazing Fit Patterns.  I was recently at JoAnns in need of something small, like a zipper and ended up purchasing five patterns (something I told myself NOT to do) simply because they were at a ridiculously low price--5 for $7.  How can you pass that up?  Well, you can't.  So I grabbed a handful and one was this little skirt.  I liked the patch pockets a lot.  I love the color of the model's skirt, it is one of my favs, so into the cart it went.  With no plan for a fabric.  I am sure in my massive stash I had something and I did!  I think I purchased this printed denim from Marcy Tilton.  It was easy to work with and I like the pattern.  It is sort of damask-like.  It has a little bit of a stretch which makes it comfortable to wear.

Pattern description: Misses' skirt in three lengths with individual pattern pieces given for slim, average and curvy fit.  Includes customized fitting instructions. 

Suggested fabrics are laundered cottons, lightweight denim, pinwale corduroy, pique, ....pretty much anything you can think of!

How were the instruction?  Fine...honestly there isn't much to putting together a skirt like this.  The instructions as sort of overkill with having you fit as you sew, but I do like those sort of reminders that help me to not have to rip out!  There are 1" side seam allowances included so you can fine tune the fit.
One thing I didn't care for was figuring out if I needed slim/average/curvy.  I actually read the directions twice trying to find that information and finally realized it was printed on the pattern tissue!  Not so helpful in my book.


Sizing--in this envelope, sizes 6 to 14 are included.  I made a 14 with an average fit.  I started with View B as C looks really short and it is much easier to lengthen a skirt but hard to make it longer and I don't think a 51 year old should wear super short skirts.  That's just me.

Likes/Dislikes:
The pockets!  Love these!  They are roomy and sewn into the side seams.
I like the yoke quite a bit.  It hits me just below the natural waist.  Not too high, nor too low.
Dislikes--none really other than hunting for whether you should make slim, average or curvy.

Alterations/Modifications: None really since you have the one-inch side seams to mess with.  I took out 4 inches of the fullness at the lower part of the skirt.  I don't mind the A-line, I just didn't want to feel like a bell.  :) 

I should have taken my hands out of the pockets for this picture.  It doesn't pull, trust me!
My booty is rather flat these days, so I did extend the darts about an inch and a half.


Recommendations: My sewing room is under construction so I used my regular machine and Hong-Kong finishes.  I like it!
I ended up interfacing the folded over portion of the pockets.  I don't like to iron, especially not denim and it seems the top part of pockets always get wonky in the wash.  I am hoping this small step prevents me having to break out the iron.    

This is an under-reviewed pattern.  It is fast, fun, and economical in that it doesn't take too much fabric.  I do recommend it, especially if the pattern is just over a dollar.

Thanks for reading!
Sue