About Me

My photo
Sewing is therapy for me. I hoard fabric, patterns, notions, and spend more time shopping for fabric than I care to admit...

Tuesday, November 25, 2014

A slouchy, comfortable dress!

New Look Misses' Knit Dress with Neckline & Length Variations  6298


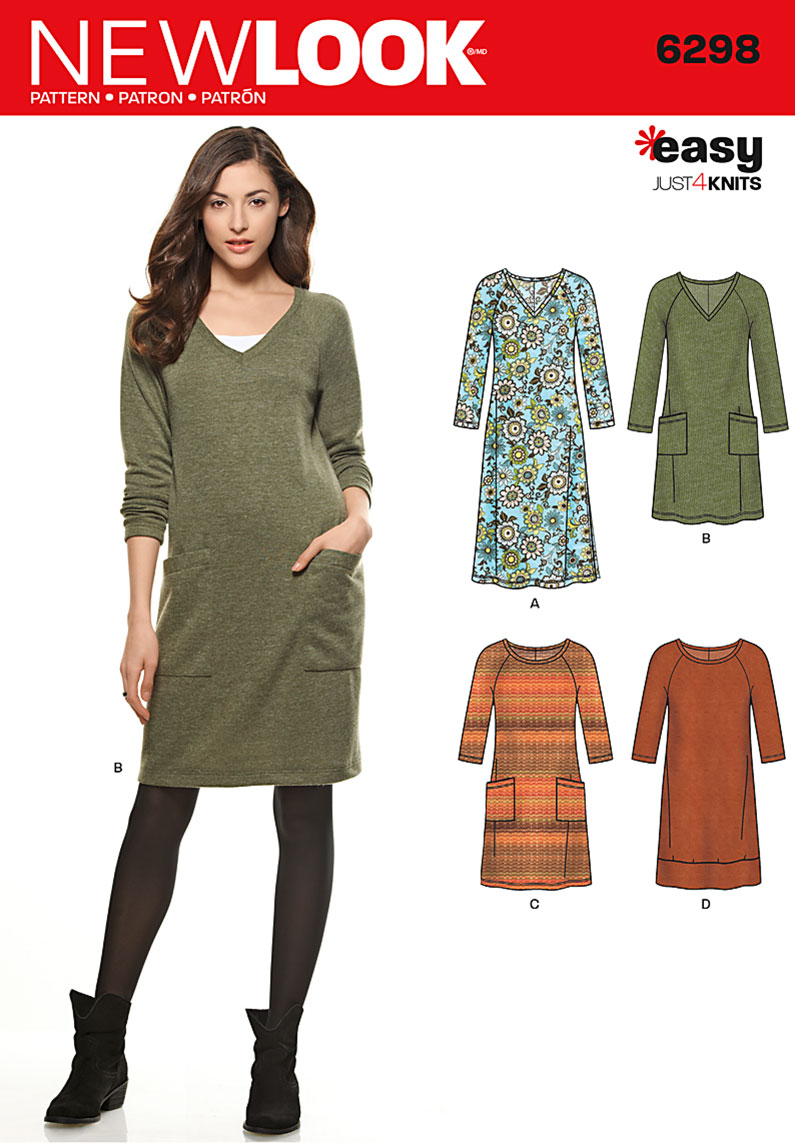
Misses' easy Just 4 Knits dress is what you are looking for this season! Knit dress with options that include v or scoop neck, long or three-quarter sleeve, pockets & cut lines for length variation. 


I made view B--straight up!  


Ever since I made my Lola dress (you can see it here) I have been wanting another comfy, knit dress to wear to work.  I've had this ponte for quite a while and wondered what the heck I was going to do with it.  I mean it's pretty and all, but the print is pretty wild and hard to match, so I did what I thought would work and pick a pattern that would work with the fabric, instead of vice-versa.  


This ponte is nice, and the print is fun, especially if you like florals, which I do!  Pontes are so nice to work with and sometimes you want more than a solid colored garment.  I hope manufacturers will continue making more prints out of this wonderful fabric!  


So back to the pattern.  As I said previously, I made view B, without any modifications to the style but of course I made a few standard alterations to the fit.  :)  I made my usual 5/8" swayback adjustment and could have done just a tad more.  Also, after making my Bronte, one of the ultra helpful readers suggested a FBA using this tutorial.  Well, I finally did it!  I finally made a FBA that worked!  This was super easy to do and I don't have any wrinkles or drag lines.  Mind you, this dress isn't as fitted as the Bronte, but I think I am onto something with the way to make a FBA without adding a dart in a knit.  Not that it is that big of a deal, especially on a busy knit, but I don't always like it on a solid.  I will be experimenting with this technique more often!  


So, with the instructions, I did glance at them and I only deviated from them slightly as I thought it would be much easier to hem the sleeves prior to attaching them to the dress.  I knew the sleeves would be the correct length, or very close to it based on just trying them on.  I also had to take it in about an inch and a half from the armpits down.  I could have taken it in more but felt like I would loose the 'look' of the dress.  


This is really low cut and I will always being wearing a cami or tee underneath.  I like wearing layers, so it's okay.  I really love the patch pockets!  Awesome!  


I do like this dress but can't quit comparing it to how much I LOVE the Lola!  Honestly, I am not sure it is really worth the cost of the pattern if you have a casual knit dress pattern you already like.  

Thanks for reading!
Sue :)  

Thursday, November 20, 2014

The Bronte Top from Jennifer Lauren

Oh goodness!  My first Bronte top!  I sometimes feel like I am the last one to the party but this time I just feel like I am sort of fashionably late.  :)  I had a lot of fun putting together this great top with such clever details!

From Jennifer Lauren's site: Bronte is a 40's inspired knit top that you can make with long or short sleeves. What makes her stand out amongst other knit top patterns is her 40's inspired shoulder detail. The back pattern piece sweeps over the shoulder creating a 40s style shrug sleeve which you can then either leave plain or decorate with buttons or other notions of your choosing. I've always loved and been drawn to 40s patterns that feature the shrug style shoulder, so it only made sense to incorporate this beautiful detail into my favourite type of top.

You can use a contrast binding around the neckline or keep her simple by using the same fabric you're making up the body with.


It's adorable!  It uses little fabric and those shoulder details are awesome! 

The fabric I used was from my stash.  I sewed a straight 14, based on my measurements.  I love how it fits but notice that annoying little fold of fabric at the bust.  Hmm....any advice for me?  


I love the shaping of the pattern and the neck bands are awesome and go together easily and professionally.  The sleeves are an awesome length--I folded mine up two inches--twice with one inch each and used a stretch stitch.  For the lower hem, I turned 3/4" and hemmed using the same stitch.  


Start to finish was about one hour--seriously!  This is an instant gratification project with awesome results.  I love that I used stash fabric and that it matches my favorite gray jeans!  
Yes, I will be making more of these!  

Thanks for reading!
Sue 

Sunday, November 16, 2014

Another pair of Vogue pants!

So, you haven't seen me make a pair of pants for a while and I decided it had been too long since I pulled out my beloved Vogue 8774.  I can't express how much I LOVE this pattern!  While this is my fifth?  Sixth? time I've made these, I still need to make some tweaks until I feel like I have mastered the fit of these awesome pants!  


I like making pants, it is a challenge and sometimes I feel like tops and dresses are sort of a fitting cop-out. Know what I mean?  There are so many things to consider when fitting pants: crotch depth and length, rise, inseam, any sort of swayback adjustment, pulling in any areas, waist-to-hips ratio, the dreaded fly, need I go on? 


So back to my creation that was sorely missing in my closet--a khaki colored pair of pants with jean styling I could wear to work.   


I was very happy with my last pair which you can see below and I tried to tweak further but I am just not totally satisfied and yes, you guessed it!  I'll be making more.  


So, how did I do all this? 
1.  Flatness--I had a suggestion to create a deeper crotch curve to help take care of the pooling I get at the upper thigh.  I'm not so happy with how this made my current pair fit!  I wish I would have tried to fold out a 1/2" at the upper back thighs as I have read on line.  I guess I see another pair of my pants in my near future!   
Because of the flatness, I had to rotate the back inseam to the front by 3/8" to get the inseams and outer seams to hang properly.  


 I don't even want to show you this next picture as I feel like I need to immediately do 1,000 lunges to perk up my derriere!  


I added rivets to dress them up just a bit as they are plain, khaki pants after all!  The rivets were super easy to add.  I have a Awl that I use to punch the holes in the fabric and then a kit from Hancock's I used to set the rivets.  They do give just a hint of something, right?  


Another thing I did was to make a swayback adjustment.  I completed that by 14" in the yoke and another 1/4" at the waistband.  I like spreading the adjustment out as I think it looks better and feels better when you wear the pants!


Wide upper thighs--pretty self explanatory, right? 
Crotch curve issues....ah, the crotch curve!  I get these annoying little lines at the front crotch that I pinched out and took about an inch seamline.  No more lines!
Back crotch curve was a different matter.  With that seamline I made a 'j' seam by taking in an additional 5/8" from the back seamline which you can see below.  Although I did create an even deeper seamline than what is pictured!  I scooped out another 1/2".   


Length is a challenge for me with this pattern.  Being only 5'7", I didn't think I would need to lengthen them but I did by about 1.5". 


Any suggestions for me with this pattern?  I feel like getting the 'perfect' fit is a challenge that I must master!  

Thanks for reading!
Sue :)  

Monday, November 10, 2014

Sewaholic Hollyburn Skirt!

From the Sewaholic site: 
Especially for beginners, this is the perfect flared skirt! A wardrobe essential, the Hollyburn Skirt has just the right amount of flare. It sits right at the waist for maximum figure flattery, and features super practical pockets!
Based on the popular Lonsdale Dress pattern, this skirt pattern includes three different lengths with three different amounts of flare. The shorter the skirt, the more flared the silhouette!
Additional details add emphasis to the waistline, with optional button tabs to feature pretty buttons, or belt loops to show off your favourite belts.
Pattern includes extra-thorough sewing instructions and detailed sewing diagrams. Perfect for your first garment project!
Easy to wear, simple to sew!
Sizing is proportioned for a pear-shaped figure: smaller waist, larger hips.


I am loving Sewaholic patterns and this is one I obtained from my Fabric Mart gift card that I won during the Fabricista Challenge.  Is this adorable or what?  I've had this fabric I purchased from JoAnn's for quite a while and I couldn't decide what to do with it.  So, I unfolded it and realized it HAD A FLIPPING LIGHTER LINE RIGHT DOWN THE MIDDLE OF THE FABRIC!  Can I get an ARGH?  I was seriously irritated as I really didn't feel very well and probably shouldn't have been sewing but sometimes you need to sew to feel better (at least that is what I told myself).  So, I cut, sewed and worked hard to cover up the lines down the fabric.  Next time, if I do buy from that p-l-a-c-e again, I am going to lay out the fabric and examine the fold line before I purchase.    I just really liked the print.  It has so many of my favorite colors in it.  

I wanted to match up the pattern down the center front and back of the skirt so that required me to cut the fabric off-grain, with the grainline at about a 30° angle.  It lays fine and all, and damn, I matched that up fabric pattern great, didn't I?  Just for fun and which you unfortunately can't see very well, I topstitched the front seam line about 3/8" from the edge.  I also decided to make a narrow hem of about 1/4" that I turned twice and stitched.  I used Steam-a-seam for this little project and wow do I love that stuff!  So easy to use and such awesome results!  

Since I am not pear-shaped, I cut a 10 in the hips and a 12 in the waist.  That is smaller than what I typically cut in the big four patterns which is a 14.  I really like the fit.  I made view B's length with the belt loops of A.  And who doesn't love pockets that aren't side-seam so they don't add bulk to the hips?  

The fabric has a bit of a stretch so it should be comfortable to wear and wow do I love my red tights with this!  I just wish I had some knee high red boots!  

This pattern is well designed and any beginner could pick up the directions and if you sew carefully could get a great result!  
Thanks for reading!
Sue :)  Have you had any disappointing fabric purchases lately?

Sunday, November 2, 2014

TGFP! My Plaid Archer Tunic

TGFP?  Thank God For Pinterest of course!  Where else can you get such fabulous inspiration for new custom garments?

                                   Long plaid boyfriend shirt, leggings, knee socks and boots. Nice Fall weekend outfit.55+ Fall Outfit Ideas, super cute clothing inspiration for fall!... Black boots, red/grey top, skinnies.ISSUU - ShopRedDress.com Christmas Look Book 2013 by The Red Dress Boutique
                                                             Piace Boutique - Small Town Plaid Top $26.99Ralph Lauren Blue Label Plaid Wool Cashmere Maxidress

These are all gorgeous!  I love them all and need some warm pieces for fall/winter which is rapidly approaching.  So...

I purchased this beautiful fabric from Marcy Tilton.  After snooping on pinterest, I had to have a plaid and really wanted a wool or wool/blend and this fit the bill!  Isn't it freaking gorgeous?  Wool has to be one of my favorite fibers to work with.  It practically begs you to manipulate it into any shape you'd like with a hot iron and says thank you--thank you very much.


For my pattern, I pulled out the uber popular Grainline Archer.  I know, I've already made it three times that you can see below, but I figured of all the shirt patterns I have, I like it best.  The fit is fab, the details are perfect so it was the winner for my project.


And, here is a pic of the pattern from Grainline Studios site.


So, for this tunic, I had to lengthen the top by 6.5 inches on the front and back.  Since this is a wool blend, I knew it would get a little scratchy around the neckline so I used a printed cotton left over from another top on the yoke facing and on the inside collar stand.  It gives my skin the little bit of relief I need from the wool.  Mind you, the wool is soft. but after a long day, sometimes wool gets a little itchy, especially around the neck.  I hope to eliminate that problem with the cotton and to give a cute contrast to the fabric.


I kept all the details the same as the pattern is written.  The sleeve length is the same, the neckline, collar, etc.  I cut a size 12 based on my FBA and wanted a looser fitting garment for a tunic.  I also copied the bias cut pockets along with the button band.  I didn't cut the cuffs on the bias, but easily could have and  possibly should have!


So what else can I tell you about the Archer?  It is well drafted, is just the right amount of loose-fitting, has great details, and I love the fit!  The directions are well written and the diagrams all make sense.  I only have two minor gripes that I could easily figure out how to fix.  Can I? Yep.  Have I? Well, one yes, the other--nope!


I think the neckline needs stay-stitched before the collar and stand is stitched on which is super easy to fix and yes, I did that one!  If you have ever had a neckline stretch out and try to make it work, you know EXACTLY what I mean.  It is difficult!


Secondly, I would like both button bands to be separate pieces.  As the pattern is written, only the right is a separate piece and the left is cut on and turned twice.  If I remember, next time I will make this easy modification.


I finished this after the sun went down so I couldn't get any outdoor pictures.  I keep trying to find a good place inside my home to get some picture without shadows, darker walls, etc but am still struggling.  I'll keep trying.  This is just inside my sewing room and while I cleaned it up a bit, DH commented that he thinks it is a disaster.


 I love my tunic and can't wait to wear it.  I love it with my denim leggings, brown belt and boots.  Lengthening this by 6.5" made this perfect for covering everything I like covered when wearing leggings!


Thanks for reading!
Sue
What Pinterest items have inspired you?